Contents
- Alumahooks and Hangers
- Step-by-Step Instructions:
- Choosing the Right Location
- Preparing the Ground
- Assembling the Poles
- Mounting the Poles
- 1. Measure and Mark
- 2. Prepare the Ground
- 3. Dig Holes
- 4. Insert the Poles
- 5. Secure the Poles
- 6. Attach String Light Hooks or Alumahooks
- 7. String the Lights
- 8. Connect to Power Source
- Hanging the String Lights
- 1. Determine the Placement
- 2. Choose the Right Equipment
- 3. Attach the Lights
- 4. Mount the Lights on Poles
- 5. Illuminate your Outdoor Space
- 6. Decorate and Finish
- Question-answer:

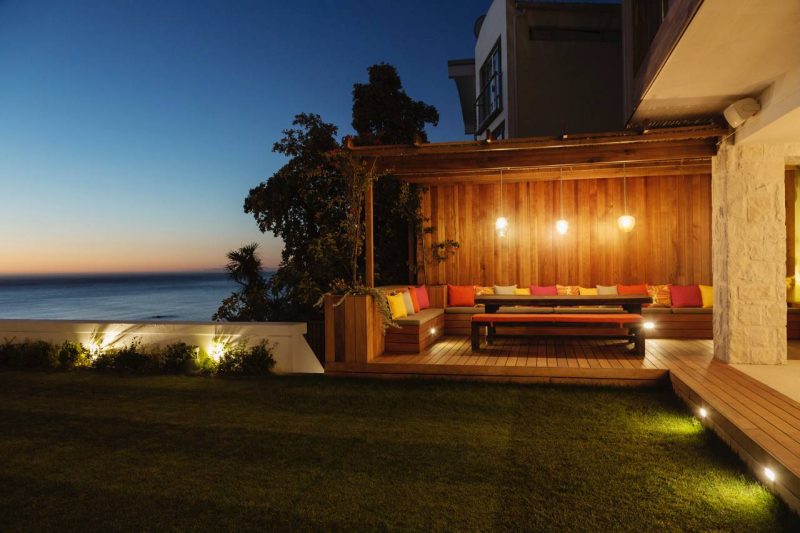
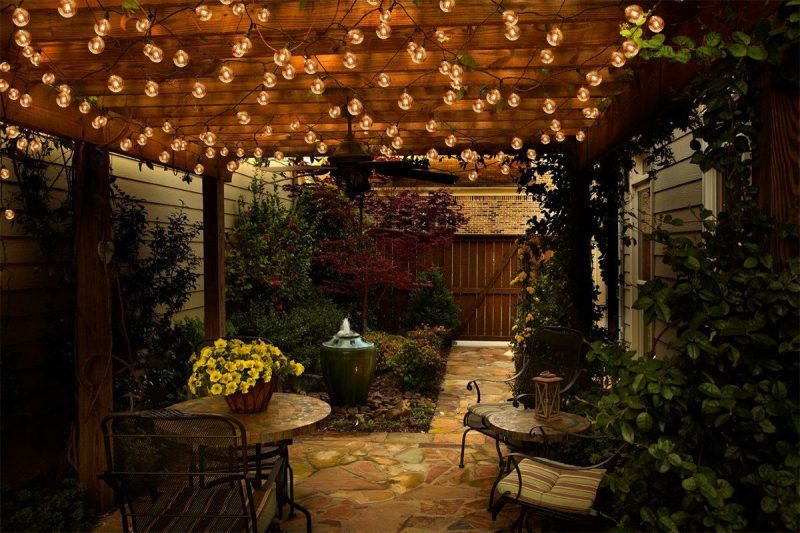
When it comes to creating a cozy and inviting atmosphere in your backyard, outdoor string lights are an excellent choice. Not only do they provide a source of functional lighting, but they also add a touch of charm and decor to your outdoor space. Whether you’re hosting a party or just looking to illuminate your backyard for some al fresco dining, string lights can be the perfect solution.
But before you can start stringing up those lights, there are a few things you need to consider. First and foremost, you’ll need to determine the best spot to install the poles. Look for a flat and level area that is free from any obstacles such as trees or structures. Make sure to measure the span between the poles to ensure you have enough string lights to fill the space.
Once you’ve chosen the location for your string light poles, it’s time to get the necessary equipment and supplies. You’ll need sturdy poles, such as metal or PVC pipes, that can withstand various weather conditions. Concrete will be needed to secure the poles into the ground, so be sure to have a drill with a concrete bit on hand. Pre-drill holes in the concrete to make the installation process easier.
Next, decide on the height of the string light poles. A general rule of thumb is to place them about 2.7 meters above the ground, as this provides a good balance between functionality and aesthetics. Use a marker and a tape measure to ensure that each pole is at the same height.
With the holes pre-drilled and the poles in place, it’s time to secure them. Mix the concrete according to the instructions on the container, and pour it into the holes. Allow the concrete to dry and set before attaching the hangers for the string lights. You can use zip ties or hooks that are specifically designed for outdoor use.
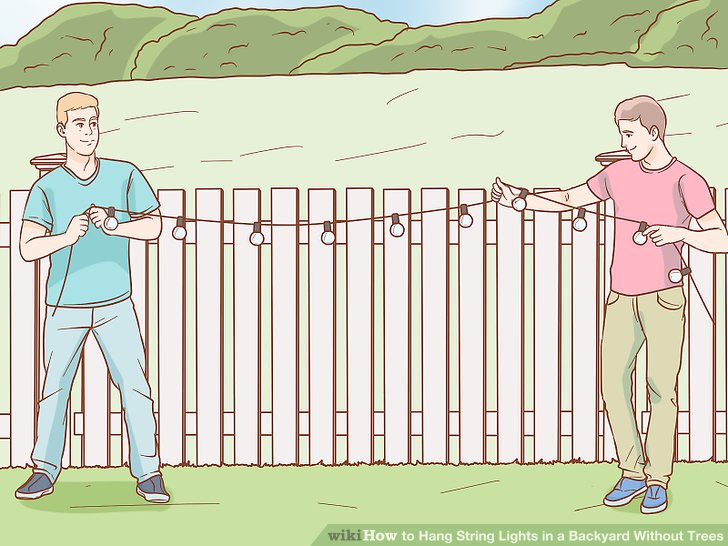
Once the poles are securely in place, it’s time to start stringing the lights. Start at one end of the space and thread the lights through the hooks or hangers. Be sure to leave enough slack so that the lights can be tightened and adjusted as needed. If you’re using multiple strings of lights, connect them together using the guidelines provided by the manufacturer.
When it comes to choosing the best string lights for your backyard, consider the color and style that will be the most complementary to your outdoor decor. LED lights are a popular choice due to their energy efficiency and vibrant colors. Test out different options to see what works best for your space and personal preferences.
Once the lights are installed, step back and admire your handiwork. The warm and colorful glow will not only illuminate your backyard but also create a cozy and inviting atmosphere for entertaining or simply relaxing under the stars. So go ahead and transform your outdoor space with the magical charm of string lights!
Alumahooks and Hangers
If you’re looking to add a touch of magic to your outdoor space, string lights are the perfect choice. Alumahooks and hangers provide an easy and convenient way to mount and hang these twinkling lights, whether you’re decorating your backyard, patio, or pool area.
Alumahooks and hangers are designed specifically for outdoor use and can be securely mounted to various structures without the need for drilling or permanent holes. These hooks and hangers come in different styles and sizes, allowing you to choose the ones that best complement your landscape and overall style.
Step-by-Step Instructions:
- Measure the area where you want to hang the string lights. Make sure to account for any trees, poles, or other structures that may interfere with the placement of the lights.
- Choose the appropriate style and size of alumahooks and hangers for your string lights. Consider whether you want to hang the lights along a wall, fence, gazebo, pergola, or other structure.
- Using the provided instructions and tools, mount the hangers or hooks onto the desired structures. Make sure they are securely fastened and will withstand the weight of the lights.
- If necessary, use wire or cables to create a straight line from one hook or hanger to another. This will ensure that your lights are evenly spaced and create a neat aesthetic.
- Begin stringing the lights by attaching them to the hangers or hooks. Start at one end and work your way to the other, making sure to keep the wires tight and the lights secure.
- If you have trees, bushes, or other plants in the area, consider using natural hooks like branches or twigs to hang the lights. This will create a more rustic and organic look.
- To finish, plug in the lights and enjoy the warm and inviting ambiance they create. You can also add complementary decorations like lanterns or plants to enhance the overall atmosphere.
Alumahooks and hangers provide an easier and more convenient way to hang string lights, allowing you to transform any outdoor space into a magical party area. Whether you’re hosting a summer barbecue or simply want to enjoy a cozy evening under the stars, investing in these hooks and hangers will make your string light installation a breeze.
Choosing the Right Location
When installing string light poles in your backyard, it’s important to choose the right location that will not only be practical but also visually appealing. Here are some steps to help you determine the best spot:
1. Assess the available space: Take a look at your backyard and consider the size and layout. Are there any trees, pergolas, or other structures that can serve as anchor points for your string light poles?
2. Consider the function: Determine how you plan to use your outdoor space. Are you looking to create a cozy, screened-in room for entertaining guests? Or do you want to illuminate a pool or patio area for night-time gatherings?
3. Check the conditions: Make sure the area you choose is suitable for installation. If the ground is hard or rough, you may need to use a concrete anchor or drilling equipment. Consider the weather conditions as well, as strong winds could potentially knock down your poles.
4. Measure and mark: Once you’ve found the perfect location, measure the distance between your anchor points. This will help you determine how many poles you’ll need and the length of string lights required.
5. Prep the area: Before digging any holes, make sure to clear away any bushes or other obstructions. This will make it easier to install the poles and hang the lights.
6. Determine the placement: Decide if you want your poles to be installed vertically or at an angle. Vertical placement is the most common and straightforward method, while angled poles can create a more dynamic and whimsical look.
7. Secure the poles: Use a post hole digger or pipe to dig holes for your poles. Make sure they are deep and wide enough to provide stability. If you’re attaching the poles to a pergola or other structure, follow the manufacturer’s instructions.
Invest in the right tools and materials: To hang the string lights, you’ll need hooks, hangers, or other hardware. Make sure to use outdoor-rated cords and bulbs to ensure they can withstand the elements.
9. Fill in the holes: Once your poles are secured, fill in the holes with soil or concrete. This will keep the poles in place and prevent them from moving or tipping over.
By carefully choosing the right location for your string light poles, you can create a gorgeous and warm outdoor space that is both functional and inviting. Whether you’re hosting a dinner party or simply looking to add some decor to your backyard, string lights will provide the perfect ambiance for any occasion.
Preparing the Ground
Before installing your string light poles in your backyard, it’s important to prepare the ground properly. Follow these steps to ensure a sturdy and secure foundation for your lights:
1. Determine the Boundaries: Start by deciding where you want to install the string light poles in your backyard. Take measurements to determine the exact locations and mark them with stakes or spray paint.
2. Measure and Pre-Drill Holes: Measure the distance between each pole and use a sketch or graph paper to plan the layout. Once you have determined the positions of the poles, use a measuring tape and mark the spots where the holes need to be drilled. Pre-drill each hole to make it easier to install the poles later.
3. Dig the Holes: Use a post-hole digger or a shovel to dig holes at each marked spot. The depth of the holes will depend on the length of your light poles, but generally, they should be at least 2-3 feet deep to ensure stability. Remove any rocks or debris from the holes.
4. Install the Poles: Place each pole into the holes and use a level to make sure they are straight and upright. Fill the holes with concrete or compact the soil around the poles to hold them in place. Allow the concrete to dry completely before moving on to the next step.
5. Attach the String Lights: Once the poles are secure, you can attach the string lights. Start by stringing the lights along the poles, making sure to connect them properly. Use zip ties or hooks to secure the lights to the poles, ensuring they are evenly spaced and hang at the desired height.
6. Connect to a Power Source: Determine the best way to connect the string lights to a power source. You can either run an extension cord from your home or install a separate outdoor power outlet. Make sure the cords are hidden or properly secured to prevent tripping hazards.
7. Finish the Installation: Once everything is set up, test the lights to ensure they are working properly. You can make any necessary adjustments to the height or position of the lights at this stage. Finally, tidy up any loose cords or excess materials for a clean and polished look.
With your string light poles properly installed, you can now enjoy the warm and inviting ambiance they provide. Whether you’re hosting a backyard party or simply enjoying a cozy evening outdoors, these lights will illuminate your space in a colorful and festive way.
Assembling the Poles
Once you have all the necessary equipment and tools for installing your backyard string lights, it’s time to assemble the poles. Follow these step-by-step instructions to ensure a smooth installation process:
- Determine the desired location for your string light poles. Make sure there is enough space for entertaining and that the poles will be evenly spaced.
- Using a marker, sketch a line on the ground to indicate where the poles will be placed. This will help you visualize the layout and ensure accuracy.
- Decide whether you will mount the poles directly into the ground or use planters as bases. If using planters, make sure they are outdoor-rated and provide stability.
- If attaching the poles to a structure like a pergola or awning, determine the best way to mount them. You may need to drill holes or use brackets to secure the poles.
- Measure from the ground up to determine how high you want the poles to be. Depending on the available space, you may choose to have them at eye level or higher.
- Prep the ground by digging holes where the poles will be placed. The depth of the holes will depend on the length of the poles and how secure you want them to be.
- Thread the string lights through the poles, making sure to keep the cords and plugs accessible for easy connection to a power source.
- Attach the poles to their respective bases or secure them in the ground using concrete or soil. Follow the manufacturer’s instructions for the specific equipment you are using.
- Use hangers or cable ties to keep the string lights taut and in place along the length of the poles. You may also need to use hooks or Alumahooks to hang the lights from walls, fences, or other structures.
- Test the string lights to make sure they are functional and provide the desired lighting effect. Make any necessary adjustments before your outdoor party or gathering.
- Once everything is set up, step back and admire your handiwork. The string light poles not only provide functional lighting but also add a decorative touch to your outdoor space.
By following these step-by-step instructions, you can easily install string light poles in your backyard and create a warm and inviting atmosphere for your outdoor events.
Mounting the Poles
Once you’ve decided on the placement of your string light poles, it’s time to start the installation process. Here’s a step-by-step guide to help you mount the poles:
1. Measure and Mark
Begin by measuring and marking the locations where you will install the poles. It’s important to ensure that you have them evenly spaced and aligned to create a visually appealing look.
2. Prepare the Ground
If you’re installing the poles in your backyard, you may need to prep the ground by removing any obstacles such as rocks or roots. This will make the digging process easier.
3. Dig Holes
Using a post hole digger or a shovel, dig holes at each marked location. The holes should be deep enough to hold the poles securely in place.
4. Insert the Poles
Place the poles into the holes, making sure they are vertical and straight. Use a level to ensure they are properly aligned.
5. Secure the Poles
Once the poles are in position, fill the holes with soil or concrete mix to secure them. Make sure the poles are tightly held in place before moving on to the next step.
6. Attach String Light Hooks or Alumahooks
If your poles don’t have built-in hooks, you can use string light hooks or Alumahooks to hang your lights. Attach them to the poles at the desired height and spacing.
7. String the Lights
Now it’s time to string the lights. Start at one end and carefully thread the string lights through the hooks, making sure they are securely attached.
8. Connect to Power Source
If you haven’t already, connect the string lights to an outdoor-rated extension cord or a power source that provides a safe electrical supply. Make sure all connections are properly sealed and insulated.
By following these step-by-step instructions, you’ll be able to mount the poles and string the lights in your backyard. This DIY project will not only illuminate your outdoor space but also create a warm and inviting atmosphere for backyard dinners, gatherings, or simply enjoying some twinkle lights on a summer evening.
Hanging the String Lights
Once you have your string light poles installed, it’s time to hang the string lights and create a gorgeous ambiance in your outdoor space. Follow these step-by-step instructions to properly hang the lights:
1. Determine the Placement
First, determine where you want to hang the string lights. Consider the layout of your backyard or patio and the areas you want to illuminate. Look for structures such as trees, pergolas, fences, or the exterior walls of your home that provide a solid structure to attach the lights.
2. Choose the Right Equipment
Invest in the right equipment to hang the string lights. You’ll need hooks, screws, or nails depending on the structure you’re attaching the lights to. Alumahooks are a popular choice for secure and easy attachment. Make sure to choose equipment that can withstand outdoor conditions such as rain, frost, or extreme temperatures.
3. Attach the Lights
Using a marker or a piece of tape, mark the locations where you want to attach the lights. Thread the string lights through the hooks or screws, keeping them tight and secure. If you’re hanging the lights from trees, use a container filled with sand or rocks to provide stability and prevent the trees from getting damaged.
4. Mount the Lights on Poles
If you have installed poles for your string lights, you can mount them directly on the poles. Measure the distance between the poles and cut the string lights accordingly. Then, use zip ties or command hooks to attach the lights to the poles. Make sure to keep the lights taut and evenly spaced.
5. Illuminate your Outdoor Space
When it’s time to connect the lights, make sure you have the necessary cords and outlets available. Choose a central location to plug in the lights and connect them. If you’re looking for a DIY solution, consider using waterproof extension cords and a timer to automate the lighting.
6. Decorate and Finish
Once the lights are hung and illuminated, take the time to decorate and finish the space. Use additional outdoor decor, such as lanterns or plants, to fill in the gaps and create a cozy atmosphere. If you have a pergola or shade structure, consider draping more lights over the top to add an extra layer of charm.
With these steps, you’ll have a beautifully lit and entertaining outdoor space to enjoy. Fill your backyard or patio with the warm glow of string lights and create a magical experience for any occasion.
Question-answer:
Where can I find string light poles for my backyard?
You can find string light poles at home improvement stores, online retailers, or specialty lighting stores.
Do the string light poles require any special assembly?
No, most string light poles come with a simple assembly process that can be done by following the instructions provided.
What materials are string light poles typically made of?
String light poles are usually made of durable materials such as aluminum or steel to withstand outdoor weather conditions.
How do I secure the string lights to the poles?
You can use zip ties to secure the string lights to the poles. Simply wrap the zip tie around the pole and the string lights, then tighten it to hold them in place.
Are there any safety precautions I should take when installing string light poles?
Yes, when installing string light poles, make sure to check for any overhead power lines that could be a safety hazard. Additionally, be cautious of how you secure the string lights to the poles to avoid any potential accidents.
What are string light poles and why should I install them in my backyard?
String light poles are tall, freestanding structures that are designed to hold and support string lights. They are typically installed in the backyard to create a beautiful and ambient lighting atmosphere for outdoor spaces. They can be used to illuminate a patio, deck, or any other outdoor area. Installing string light poles in your backyard can enhance the overall aesthetic appeal and create a cozy and inviting atmosphere for outdoor gatherings or relaxation.
Do I need any special tools or equipment to install string light poles?
Yes, you will need a few tools and equipment to install string light poles in your backyard. Some of the essential tools include a post hole digger or shovel for digging holes, a level for ensuring the poles are straight, a tape measure for accurate measurements, and a drill or screwdriver for attaching the poles to the ground. Additionally, you will need zip ties or other types of hardware to secure the string lights to the poles. It’s also recommended to have a ladder or step stool to reach the top of the poles during installation.

 Ultimate Guide How to Clean Outdoor Furniture for a Total Seasonal Refresh
 Stay Warm in Style with These 8 Smart Ways to Heat Your Outdoor Patio!
 A Comprehensive Guide to Building a Patio with Step-by-Step Instructions and Expert Tips