Contents
- Preparing the Area
- Clearing the Space
- Leveling the Ground
- Calculating Materials
- 1. Measure the Area
- 2. Mark the Outer Edge
- 3. Calculate Materials
- 4. Arrange for Professional Help
- Excavating the Area
- Preparing for Excavation
- Excavation Process
- Marking the Layout
- Digging the Foundation
- Layout and Measurement
- Digging the Foundation
- Tamping and Adjustments
- Layout the Stones
- Finishing Touches
- Question-answer:

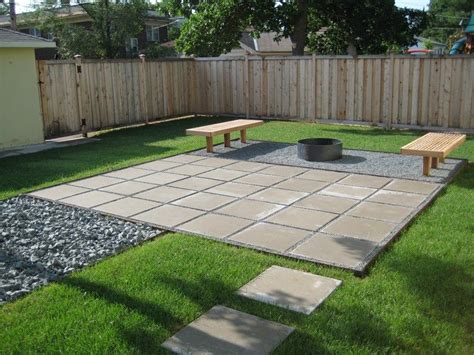
Are you looking to transform the edge of your yard into a beautiful outdoor living space? With a little bit of planning and some hard work, you can create a DIY paver patio in just one day. Paver patios are a great way to add functionality and style to your outdoor area, whether you want a space for entertaining guests or a peaceful retreat to enjoy on your own.
The first step in building your DIY paver patio is to survey the area and determine the desired size and placement. Use a surveyor’s tape measure to calculate the dimensions of the patio, making sure to account for any slopes or angles. This will help you determine the amount of materials you’ll need and ensure a perfect fit.
Next, it’s time to prepare the installation area. Begin by excavating the designated space to a depth of about 6 inches. This will allow room for the paver stones, as well as a layer of gravel and sand for stability. Make sure the area is level using a leveling board and adjust as needed. It’s important to have a firm and well-prepared surface to ensure the longevity of your patio.
Once the excavation is complete and the area is level, it’s time to lay the foundation for your paver patio. Start by placing landscape fabric over the entire area. This will help prevent weed growth and keep the surface stable. Next, add a layer of gravel, followed by a layer of sand. Use a screed or a straight board to ensure the sand is level and even across the entire area.
Now it’s time to start laying the paver stones. Begin by collecting an arrangement of stones in the desired pattern or design. You can explore different designs, such as a simple rectangular or a more intricate circular pattern. Lay the first paver stone in one corner of the patio and continue laying the stones, making sure they fit snugly together. Use a rubber mallet to gently tap each stone into place.
As you lay the paver stones, use a level and a tape measure to ensure they are straight and even. Make any necessary adjustments to the base or the stones themselves to achieve a level surface. This is crucial for both the appearance and the function of your patio.
Once all the paver stones are in place, it’s time to fill the gaps between them. Use a fine-grade sand to fill in the cracks, making sure to brush away any excess. This will help lock the stones in place and prevent them from shifting or moving. You can also use a sealant to protect your new patio from weather damage and to give it a finished look.
In addition to the paver stones and the necessary tools, you’ll also need some basic equipment to complete this project. A shovel will be needed for excavation and leveling, while a wheelbarrow will come in handy for transporting materials. A tape measure and a level are essential for accurate measurements and alignment. You may also want to rent a power washer to clean the surfaces before and after installation.
Building a DIY paver patio is a rewarding project that can save you money and provide a beautiful outdoor space for years to come. By following these step-by-step instructions and using the right materials and tools, you can create a patio that is both functional and aesthetically pleasing. So go ahead, gather your supplies, grab a shovel, and get ready to enjoy your new outdoor oasis!
Preparing the Area
Before you begin installing your DIY paver patio, it’s important to properly prepare the area to ensure a solid foundation and long-lasting results. Here’s what you need to do:
1. Measure and mark: Start by determining the size and layout of your patio. Measure the desired square footage and use string and stakes to mark the boundaries of the patio. This will help you visualize the final result and ensure that the patio fits properly in the available space.
2. Check for utilities: Before you start excavating, it’s crucial to check for underground utilities. Contact your local utility companies to explore the area and mark any utility lines. This will prevent accidental damage and ensure your safety during the construction process.
3. Excavate the area: Use a shovel or rent an excavator to remove the top layer of grass and soil within the marked boundaries. Dig down to a depth of 6-8 inches, or as required by your specific project needs. This will provide enough space for the pavers, sand, and gravel layers.
4. Control erosion: If your patio area is on a slope, you may need to prevent erosion by adding retaining walls or landscaping fabric. This will help stabilize the soil and prevent shifting over time. Consider consulting with a landscaping professional for the best solution for your specific situation.
5. Calculate gravel and sand: Depending on the size and layout of your patio, you’ll need to calculate the amount of gravel and sand required. Aim for a 2-inch layer of gravel as a base and a 1-inch layer of sand for the pavers to rest on. Use an online calculator or consult paver manufacturers’ guides to determine the exact amounts needed.
6. Lay the gravel: Once the excavation is complete, add a layer of top-quality gravel and use a plate compactor to ensure it is properly compacted. This will provide a solid and stable base for your pavers and prevent any sinking or shifting in the future.
7. Add landscape fabric: In addition to the gravel layer, it’s useful to lay down landscape fabric over the soil. This will help prevent weeds from growing between the pavers, ensuring a clean and low-maintenance patio.
8. Lay the sand: After the gravel layer is in place, spread a layer of fine sand over the area. This will create a smooth and even surface for the pavers to be laid on. Use a screed or straight board to distribute the sand evenly and ensure a uniform height throughout the patio.
9. Install edging: To prevent the pavers from shifting, install plastic or metal edging around the perimeter of the patio. This will provide support and keep the pavers in place, even with foot traffic and weather conditions.
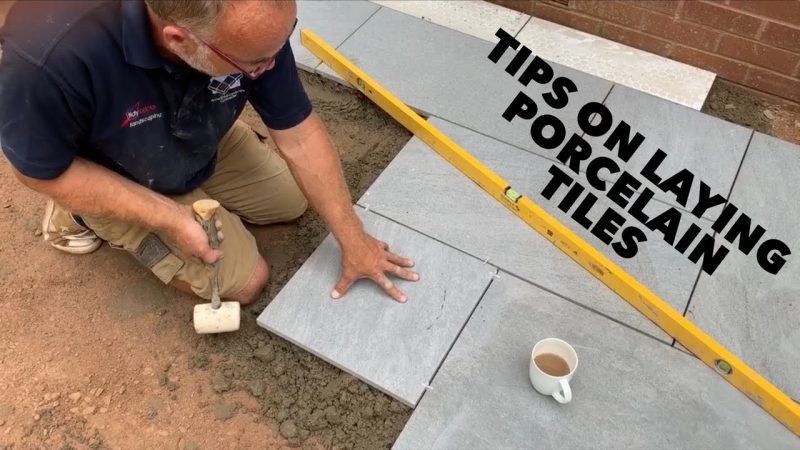
10. Begin laying the pavers: Now it’s time to start laying the pavers. Begin at one corner and work your way across the patio, placing each paver tightly against the next one. Use a rubber mallet to tap the pavers into place, ensuring they are level and secure.
By properly preparing the area before laying the pavers, you’ll ensure a stable and durable patio that can withstand the test of time. Take your time in this step, as it is crucial for the overall success of your DIY project.
Clearing the Space
Before you can start building your DIY paver patio, you’ll need to clear the space where it will be located. This involves several important steps to ensure a solid foundation for your patio.
First, gather all the necessary tools and materials for the project. You’ll need a top-quality broom, string, flagging, a tape measure, a square, a pencil or marker, a straight edge, a shovel, a wheelbarrow, and a hand tamper or plate compactor.
Next, mark the location and shape of your patio. Use flagging and string to outline the area, ensuring that the corners are at 90-degree angles for a square or rectangular patio. If you want a curved or irregular shape, use the string to create the desired layout.
Once the location is marked, it’s time to start digging. Use the shovel to remove the grass and any other plants or debris from the area. Dig down about 9 inches, or the required depth for your specific patio design.
To prevent weeds from growing through the pavers, lay down a geotextile fabric. This fabric will also help to prevent the base materials from mixing with the soil below.
Next, build up the edge of your patio using a solid outer border. This can be made from a variety of materials, such as bricks or concrete pavers, and should be at least 6 inches thick. Use a hand tamper or plate compactor to ensure a solid base.
After the edge is in place, you can start laying the base materials. Spread a 4-inch layer of crushed stone over the entire area. Use a rake or broom to level the stone, then use a hand tamper or plate compactor to compact it down.
Now it’s time to screed the stone. Use a straight edge to create a level surface, running it along the top of the outer edge and across the stone base. Make sure to check for level in multiple spots to ensure accuracy.
If your patio will be sloped to accommodate drainage, this is the time to make those adjustments. Use a level to determine the desired slope, then adjust the base as needed.
Once the base is level and solid, it’s time to lay the pavers. Start in one corner and work your way out, placing the pavers tightly together. Use the string as a guide to ensure straight lines.
If your patio design involves patterns, be sure to plan accordingly. Some patterns may require cutting pavers to fit. Use a diamond blade masonry saw or a guillotine-style splitter to cut the pavers as needed.
As you lay the pavers, make sure to leave a small gap, about 1/8 inch, between each of them. This gap will be filled with jointing sand to provide stability and prevent the pavers from shifting over time.
For a finished look, consider adding an optional edge restraint around your patio. This can be done with a variety of materials, such as plastic or aluminum, and will help to keep the pavers in place.
Once all the pavers are in place, use a broom to sweep jointing sand into the gaps between them. This will help to lock them together and prevent weed growth.
Finally, admire your hard work! Your DIY paver patio is now complete and ready to be enjoyed all summer long.
Leveling the Ground
Before you begin laying the pavers, it’s important to properly prepare the ground to ensure a stable and solid foundation for your patio. Follow these steps to level the ground:
1. Determine the Location: Select a suitable location for your patio, ensuring it is away from any trees or structures that may cause issues in the future. Use a surveyor’s tool or a long piece of string and stakes to mark out the shape and size of your patio.
2. Clear the Area: Remove any grass, plants, rocks, or debris from the marked area. This will help create a clean and even surface for the patio.
3. Excavate the Ground: Use a shovel or excavator to dig down to a depth of about 6 inches. This will give you enough space to lay the necessary layers of gravel, sand, and pavers. If the ground is uneven, make sure to level it out as you dig.
4. Save the Excavated Soil: Keep the soil you’ve excavated in case you need it later for filling in any low spots or creating raised areas.
5. Install Geotextile Fabric: Lay a geotextile fabric over the excavated area. This fabric will help prevent weed growth and stabilize the soil.
6. Add and Level Gravel: Pour a 3-inch layer of gravel onto the geotextile fabric. Use a plate compactor or hand tamper to evenly compact the gravel. This will provide a stable base for your patio.
7. Lay the Bedding Sand: Add a 1-inch layer of bedding sand on top of the compacted gravel. Use a long, straight board or a screed to level the sand.
8. Check for Levelness: Use a level to ensure that the sand is smooth and level across the entire patio area. Adjust as needed until it is perfectly level.
9. Begin Laying the Pavers: Start laying the pavers from an edge, following your desired pattern or design. Leave a 1/8 inch gap between each paver for jointing sand.
10. Cut Pavers if Needed: If you need to fit pavers along the edges or in corners, use a saw or chisel to cut them to the proper size and shape.
11. Fill the Joints: Once all the pavers are laid, fill the joints with fine sand. Use a broom to spread the sand evenly and then use a plate compactor to vibrate the sand into the gaps.
12. Compact the Pavers: Run the plate compactor over the entire patio surface, making sure the pavers are level and secure. This will help settle the pavers and lock them in place.
13. Apply a Sealer: If desired, you can apply a sealer to the pavers to enhance their color and protect them from stains.
14. Enjoy Your Outdoor Oasis: Once the sealer is dry, your DIY paver patio is complete! Now you can add finishing touches, such as outdoor furniture, plants, and lighting, to create the perfect outdoor oasis.
Calculating Materials
Before you start prepping the area for your DIY paver patio, it’s important to calculate the materials you’ll need. This will ensure that you have everything on hand and make the installation process much easier.
Here are some helpful tips to guide you:
1. Measure the Area
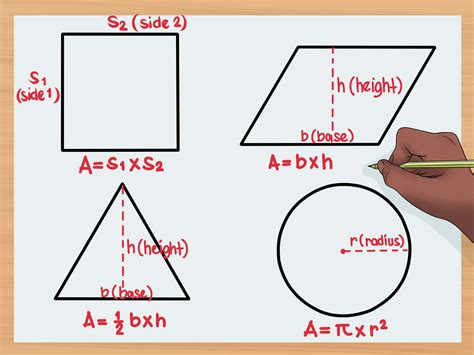
Start by measuring the area where you plan to install the patio. Use a tape measure to determine the length and width in feet. Multiply these two numbers to get the total square footage. For example, if your patio is 10 feet long and 12 feet wide, you will have a total area of 120 square feet.
2. Mark the Outer Edge
Once you know the dimensions, use stakes and string to mark the outer edge of the patio. This will give you a visual representation of the space and help you determine the shape and design.
3. Calculate Materials
Now it’s time to calculate the amount of materials you’ll need. Most paver patios require a sub-base, bedding sand, and pavers themselves. For the sub-base, you’ll need around 4-6 inches of gravel or crushed stone. Measure the length and width of the patio in feet and multiply by the depth in inches to calculate the amount of gravel needed.
For the bedding sand, you’ll need around 1 inch. Again, calculate the area of the patio in square feet and multiply by 0.0833 (1 inch in feet) to determine the cubic footage of sand. This will help you know how much sand to purchase.
Finally, to calculate the number of pavers needed, divide the total square footage of the patio by the square footage of one paver. Depending on the size of the paver, you might have to account for spacing between them as well.
4. Arrange for Professional Help
If you’re unsure about the calculations or need advice on materials, don’t hesitate to seek professional help. They can guide you through the process and ensure that you have all the necessary materials for your project.
Taking the time to calculate materials before you start prepping the area ensures that you have a firm foundation for your paver patio. It helps you know exactly what you need and prevents any unexpected surprises during the installation process.
Now that you know how to calculate materials, you can move on to prepping the area and enjoying your new outdoor oasis.
Excavating the Area
Before you can begin installing your DIY paver patio, you’ll need to properly excavate the area. This step is crucial because it will ensure a firm and level surface for your patio.
Preparing for Excavation
1. Determine the shape and size of your patio. Use a tape measure to carefully measure the area and use a paint or chalk to draw the outline of your patio on the ground.
2. Arrange for any necessary pre-demolition tasks. If there are any existing structures or landscaping features in the area where you want to install the patio, you may need to remove them or make necessary changes before you can excavate.
3. Know the location of any underground utilities. Use a utility locator or contact your local utilities company to make sure you don’t accidentally dig into any important lines or pipes.
Excavation Process
1. Start by removing the top layer of grass and vegetation from the area. Use a shovel to cut through the grass and then use a rake or broom to clear away any loose debris.
2. Use an excavator or shovel to dig down to the desired depth. The depth will depend on the type of pavers you are using and any optional bedding or base material you plan to install. A general rule of thumb is to excavate about 8 inches deep, but check the instructions from the paver manufacturer for specific guidance.
3. As you excavate, be sure to create a level surface. Use a level or a straight board to check that the bottom of the excavation is even. You may need to add or remove soil to achieve a level surface.
4. Remove any large rocks or roots that may be in the excavation area. These can interfere with the installation of the pavers.
5. Once the excavation is complete, use a compactor to pack down the soil. This will help create a firm and stable base for your patio. Compact the soil in small, overlapping areas, starting from the outer edges and working your way towards the center.
6. After compacting, check the excavation area again to ensure that it is level and free of any debris or bumps.
Now that you’ve completed the excavation process, your DIY paver patio is one step closer to being installed. The next step is to prepare the area for the pavers by adding a special bedding and base material. This will provide additional stability and help control the growth of weeds. Follow the next step-by-step guide to continue with the installation process.
Marking the Layout
Before you begin installing your DIY paver patio, it’s important to mark out the layout of the area. This will help ensure that you have a clear plan and guide to follow during the installation process.
Here are the steps to marking out the layout:
- Start by using a measuring tape to measure the area where you want to install the patio. Take note of the dimensions and jot them down.
- Next, use stakes and strings to outline the perimeter of the patio. Position the stakes at the corners and run the strings between them to create clear lines. This will give you a guide to work with and prevent any guesswork.
- Once you have the perimeter marked, you can use spray paint or marking paint to define the edges. This will make it easier to see the layout and prevent any accidental damage to the area.
- If you plan to include any structures or features in your patio, such as a fire pit or built-in seating, mark their locations within the layout as well.
- To add some variety and visual interest, consider using different patterns or sizes of pavers. This can be achieved by simply adjusting the layout and making cuts as needed.
- If you have any existing structures or obstacles in the area, such as drains or utility lines, mark them out and take them into account when planning the layout. You may need to make adjustments to accommodate them.
- Optional: If you want to install lighting or electrical outlets in your patio, this is the time to include conduit in your layout. This will allow you to hide the wires underground and connect them to the main supply.
Once you have the layout marked out, you can move on to the next step in the installation process. Properly marking the layout is essential for a successful DIY paver patio project, as it ensures that everything fits and looks the way you want it to.
Digging the Foundation
Before you start laying the pavers, you’ll need to prepare the foundation by digging the appropriate depth. This step is crucial as it ensures a stable and long-lasting patio.
Layout and Measurement
First, you’ll need to determine the layout and size of your patio. Measure the area where you want the patio to be and mark it off with stakes and string. You can also use a special online tool to help you calculate the square footage.
Next, you’ll want to draw the design of your patio on paper or a computer program to have a visual representation. This will help you determine the number and sizes of pavers needed.
Digging the Foundation
Using a shovel or a small excavator, start digging down to the desired depth of your patio. The depth will depend on the thickness of your pavers and the recommended depth for the sub-base material. Typically, a depth of 7 to 8 inches would be sufficient.
As you dig, make sure to slope the ground away from your house to prevent water from pooling near the foundation. Take extra care to ensure that the foundation is evenly leveled by using a flat board or level.
If there are any high spots, remove some of the soil. For low spots, add more soil to bring it up to the desired level. This step is important to achieve a level and smooth finish for your patio.
Tamping and Adjustments
Once the ground is leveled, use a tamper or plate compactor to firm up the soil. This will help prevent sinking and settling in the future. Make sure to tamp the soil in small sections at a time, making multiple passes until it feels solid.
If necessary, make any final adjustments to ensure a level surface. Use a measuring tool and check the distance between the patio and any nearby structures or landscaping elements. Adjustments may include adding or removing soil to achieve the desired height.
Layout the Stones
If you’re using a special edging material, like plastic or metal, secure it in place around the perimeter of the patio. This will help keep the pavers in place and prevent shifting over time. It will also give your patio a clean and finished look.
Next, you can start placing the pavers in the desired pattern. If you’re using different sizes or shapes, refer to your design and follow the recommended pattern. Leave about a 1/8-inch gap between each paver to allow for joint sand.
As you lay the pavers, make sure to periodically check that they are level. Use a level to ensure that they are even and adjust if necessary. It’s important to take your time with this step, as it will impact the overall appearance and functionality of your patio.
Finishing Touches
Once all the pavers are in place, spread joint sand over the entire patio. Use a broom or brush to sweep the sand into the cracks between the pavers. This will help lock the pavers in place and prevent shifting.
After sweeping, use a plate compactor or tamper to firmly tamp down the sand. This will help settle the sand and ensure that it fills the joints evenly. Make multiple passes over the entire patio until the joints are fully filled.
Finally, use a garden hose to lightly mist the patio. This will activate the joint sand and help it harden in place. Allow the patio to dry completely before walking on it or adding any furniture.
With the proper tools, equipment, and instructions, building a paver patio can be a fun DIY project that you can complete in just one day. Once finished, you can enjoy your outdoor oasis and have a beautiful and functional space to relax and entertain.
Question-answer:
What tools do I need to demolish an existing patio?
To demolish an existing patio, you will need tools such as a sledgehammer, pry bar, and a shovel. These tools will help you break up and remove the old patio material.
Do I need any special skills or experience to demolish a patio?
No, you do not need any special skills or experience to demolish a patio. However, it is important to exercise caution and follow safety guidelines while using the tools during the demolition process.
How long does it typically take to demolish a patio?
The time it takes to demolish a patio can vary depending on the size and complexity of the project. However, on average, it may take a few hours to a day to complete the demolition process.
What should I do with the debris from the demolished patio?
Once the patio is demolished, you can dispose of the debris in several ways. You can either rent a dumpster, hire a waste removal service, or make use of your local landfill or recycling center.
Can I repurpose the materials from the demolished patio?
Yes, you can repurpose the materials from the demolished patio if they are still in good condition. For example, you can use the paving stones for other DIY projects or sell them to someone who may need them.
What tools do I need for the pre-demolition of my patio?
For the pre-demolition of your patio, you will need a shovel, a wheelbarrow, a sledgehammer, a pry bar, and safety equipment such as gloves and goggles.
How long does the pre-demolition process usually take?
The time it takes to complete the pre-demolition process depends on the size of your patio and the condition of the existing pavers. However, it usually takes a few hours to remove the old pavers and prepare the area for the new patio.

 Ultimate Guide How to Clean Outdoor Furniture for a Total Seasonal Refresh
 Stay Warm in Style with These 8 Smart Ways to Heat Your Outdoor Patio!
 A Comprehensive Guide to Building a Patio with Step-by-Step Instructions and Expert Tips