Contents
Contents
- Tools and Materials You Will Need
- Tools:
- Materials:
- Step 1: Prepare the Roof Surface
- Step 2: Measure and Cut the Flashing
- Common Do’s and Don’ts for Flashing Installation:
- Step 3: Install the Flashing
- Step-by-Step Guide:
- Common Flashing Solutions
- Step 4: Seal the Flashing
- Question-answer:

When it comes to roofing, improper installation or missing elements can lead to costly repairs and water-tight issues. One essential component that homeowners must ensure is properly placed is roof flashing.
Flashing is a kind of metal or steel material that extends the life of your roof by preventing water from reaching areas near chimneys, vents, and other roof edges. Having these water-tight solutions-focused pieces of flashing in the right places will avoid accidents and leaks in your home.
So, what is the proper technique for roof flashing installation? In this article, we will walk you through a step-by-step guide to ensure that your flashing is installed correctly. From basic tips to advanced details, we’ll cover everything you need to know to have a leak-free roof for years to come.
Step 1: Understand the purpose of flashing.
Before we dive into the installation process, it’s important to understand why flashing is necessary. Flashing helps keep your roof water-tight by sealing gaps and joints between different roofing materials. It prevents water from seeping into your home and causing damage to the underlying structure.
Step 2: Consult a professional or your homeowner’s association.
If you’re unsure about the type of flashing or technique to use for your specific roof, it’s always best to consult a professional roofer or your homeowner’s association. They can provide advice tailored to your roof’s unique architectural design and recommend the best flashing materials for your home.
Step 3: Locate the areas that require flashing.
Walk around your home and identify the areas where flashing is needed. These usually include areas around chimneys, vents, dormers, valleys, skylights, and roof edges. Look for any signs of previous flashing damage or missing flashing.
Step 4: Measure and cut the flashing pieces.
Using a measuring tape, measure the length and width of the areas where the flashing will be placed. Cut the flashing pieces to the appropriate size, making sure they extend at least 4 inches beyond the area to ensure proper coverage.
Step 5: Clean the surface and apply roofing cement.
Before applying the flashing, clean the surface thoroughly to remove any dirt or debris. Apply a layer of roofing cement on the surface and press the flashing firmly into place, making sure it is flat and secure.
Step 6: Repeat the process for each flashing area.
Repeat the measuring, cutting, cleaning, and applying process for each area that requires flashing. Take your time to ensure that each flashing piece is properly installed and securely fastened to the roof surface.
Step 7: Double-check for proper fit and tightness.
Once all the flashing pieces are in place, double-check that they fit snugly and are tight against the roof surface. Avoid over-tightening the fasteners, as this can damage the flashing or roof shingles.
In conclusion, proper installation of roof flashing is essential for maintaining a leak-free roof. By following these step-by-step instructions and heeding the dos and don’ts of flashing installation, you can ensure that your roof stays in great shape for years to come.
Tools and Materials You Will Need
Properly installing roof flashing is an important task that should not be taken lightly. To ensure a leak-free and long-lasting roof, you will need the following tools and materials:
Tools:
- Contractor or flat pry bar
- Hammer
- Tin snips
- Roofing nails
- Tape measure
- Pencil or marker
- Safety glasses
- Gloves
- Work gloves
- Ladder or scaffolding
Materials:
- Flashings (metal or thermoplastic)
- Roofing cement
- Roofing nails
- Roofing shingles
- Drip edge
- Roofing underlayment
- Roofing sealant
- Roofing tape
- Caulk gun
- Flashing cement
- Roofing screws
- Seam tape
Before starting any project, it is important to keep safety in mind. Make sure to read and follow all safety guidelines provided by the manufacturer and use proper protective gear. If you are not comfortable working at heights or don’t have experience with roof installations, it is recommended to seek the help of a professional roofer or contractor.
Investing in high-quality tools and materials is also crucial for a properly finished roof flashing installation. Using subpar products can lead to improper fits, compatibility issues, and ultimately, roof leaks. Make sure to choose flashings that are malleable and can be shaped to fit any type of roof surface or architectural detail.
When it comes to flashings, there are multiple types available on the market. Choose the kind that meets your specific needs, whether it’s for chimneys, valleys, skylights, or other roof penetrations. Additionally, consider the climate in your area and invest in flashings that are compatible with the weather conditions, such as rain and extreme temperatures.
Proper roof flashing installation is not only important for the overall look and finish of your home, but also for preventing water intrusion and costly damage. It helps keep debris, water, and other elements outside, ensuring that your home remains dry and leak-free. It also acts as a base for the roofing shingles, keeping them in place and preventing them from sagging or becoming damaged.
In conclusion, whether you’re a homeowner or a professional roofer, understanding the importance of proper roof flashing installation is crucial. By learning the dos and don’ts, investing in the right tools and materials, and seeking the help of a professional when needed, you can ensure a leak-free and long-lasting roof that meets the manufacturer’s warranty guidelines. Remember, it’s always better to do it right the first time than to have to repeat the project or deal with the consequences of improper flashing installation.
Step 1: Prepare the Roof Surface
Before installing roof flashing, it’s important to properly prepare the surface to ensure a successful installation. Neglecting this step could lead to problems down the line, so taking the time to plan and execute the right steps will help extend the life of your roof and prevent common issues.
The first thing you should do is inspect your roof for any signs of damage or problems. Look out for missing or damaged shingles, sagging areas, or gaps in the construction. If you notice any issues, it’s crucial to address them before proceeding with the flashing installation.
Next, make sure you have all the necessary tools and materials on hand. For this step, you will need rubber boots, a roofing hammer, nails, a utility knife, and a chalk line. Additionally, consider reaching out to your local roofing contractor for assistance or better solutions-focused advice.
Once you have everything you need, start by ensuring that the roof surface is clean and free of debris. Use a broom or brush to remove any dirt or leaves, making sure the area is ready for the installation process.
If you have a skylight or chimney, it’s important to consider how the flashing will fit around these areas. Inspect the base of the skylight or chimney and make sure it is in good condition. If any part of it is damaged, call a professional to assess and repair it.
If you are working with valley flashings, consider using steel instead of the more common copper. Steel flashings are more compatible with most roofing systems and can prevent corrosion over time.
It’s also important to make sure the roofing material you are using is compatible with the flashing. Installing flashing that is not the right type or size for your roof can result in leaks and other problems.
Before applying the flashing, take the time to measure and cut the necessary pieces. Ensure that each piece overlaps correctly and covers all the required areas. Applying flashing that is too short or incorrectly positioned can compromise the roof’s integrity.
While installing the flashing, take care not to slide it under any shingles or roofing material. This can damage the roof and cause leaks. Instead, make sure the flashing touches the surface and is properly nailed down.
Finally, make sure to seal any gaps or overlaps with a quality roof sealant. This prevents water from rushing into these areas and causing leaks. Be sure to apply the sealant according to the manufacturer’s instructions.
By following these steps and ensuring proper preparation, you can successfully install roof flashing and protect your home from water damage. Taking the time to do it right will extend the life of your roof and prevent costly repairs in the future.
Step 2: Measure and Cut the Flashing
Before you begin the installation process, it’s important to accurately measure and cut the flashing to ensure a proper fit. This step is crucial to create a secure and weatherproof seal since properly cut and fitted flashing helps protect your roof from water damage and other elements.
When measuring the flashing, make sure to account for expansion and contraction due to temperature changes. This will help you choose the right size of flashing and prevent any future problems. Additionally, consider any architectural elements such as chimneys, valleys, or windows that the flashing needs to cover.
Start by placing a piece of underlayment or base layer over the area where the flashing will be installed. This acts as an added layer of protection and helps maintain the integrity of the roof. If the existing flashing is damaged or worn, it’s essential to repair or replace it before installing the new flashing.
When cutting the flashing, use a sharp pair of snips or tin cutters. Cut the flashing based on your measurements, ensuring that it overlaps the adjoining pieces by at least 4 inches. Overlapping provides additional protection against water penetration and helps maintain a continuous barrier.
Remember, flashing needs to be malleable to fit around corners and other protrusions correctly. If your flashing is not bending easily, you can use a rubber mallet or similar tool to assist in shaping it. Be careful not to damage the flashing during this process.
As you work on installing the flashing, keep in mind that different areas of your roof may require different types of flashing. This includes boots for vent pipes, counter flashing for chimneys, or custom flashing for unique architectural elements.
It’s also important to follow local building codes and regulations when installing the flashing. Codes may specify the type of flashing material to use, the size of the overlap, or other requirements. Following these codes ensures that the flashing will perform correctly and last for its intended lifespan.
Here are a few tips to keep in mind during the flashing installation:
- Make sure the flashing is sealed tightly against the roof and any adjoining surfaces. Avoid gaps or sagging that could allow water infiltration.
- Use sealants or roofing cement under the edges of the flashing to create a watertight seal.
- Inspect the existing flashing for signs of damage or deterioration and make any necessary repairs or replacements.
- If you’re unsure about the correct flashing installation or are battling a complex roof design, consider hiring professionals to assist you. They have the expertise and experience to ensure the flashing is installed properly and meets all necessary requirements.
- Instead of using steel flashing, consider using custom architectural flashing materials for a better aesthetic choice and enhanced durability.
By correctly measuring and cutting the flashing, you can ensure a proper fit and create a seal that protects your roof from water damage. Taking the time to do your homework and following these steps will help ensure a successful flashing installation and a longer lifespan for your roof.
Common Do’s and Don’ts for Flashing Installation:
- Do place the flashing over the underlayment or base layer to create a continuous barrier.
- Do make sure the flashing overlaps by at least 4 inches to provide adequate protection.
- Don’t forget to check for any missing or damaged flashing that needs to be repaired or replaced.
- Don’t overlook following local building codes and regulations for flashing installation.
In conclusion, properly measuring, and cutting the flashing is an essential step in the roof installation process. It ensures a secure and weatherproof seal, protecting your roof from water damage and other elements. Following the correct steps and guidelines will help you install the flashing correctly and maintain the longevity of your roof.
Step 3: Install the Flashing
Once you have completed the necessary preparation work, it’s time to install the flashing. Flashing is a crucial component of any roofing system because it helps to prevent water from penetrating the roof and causing damage. By installing flashing properly, you can ensure that your roof remains leak-free for years to come.
First, gather your team and gather all the necessary materials and tools. Depending on the type of flashing you are installing, you may need malleable flashing made of steel or other materials. Make sure to consult with a local expert to determine what type of flashing is best for your specific roof.
Step-by-Step Guide:
1. Begin by placing the flashing at the bottom edge of the roof slope. The flashing should overlap the roofing material on the slope by at least 6 inches. This overlapping technique helps to ensure that water doesn’t seep under the flashing and into the roof.
2. Use fasteners, such as nails or screws, to secure the flashing in place. Make sure to follow the manufacturer’s instructions for the type and placement of fasteners, as this may vary depending on the specific product you are using.
3. Repeat this process for all other flashings, such as those around skylights or chimneys. Each flashing should be installed in the same way, ensuring that it overlaps with the adjacent flashings to create a continuous barrier against water intrusion.
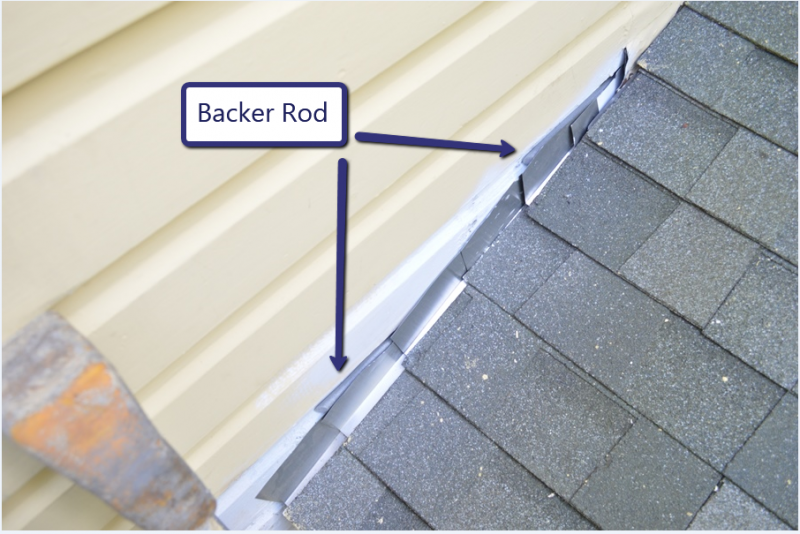
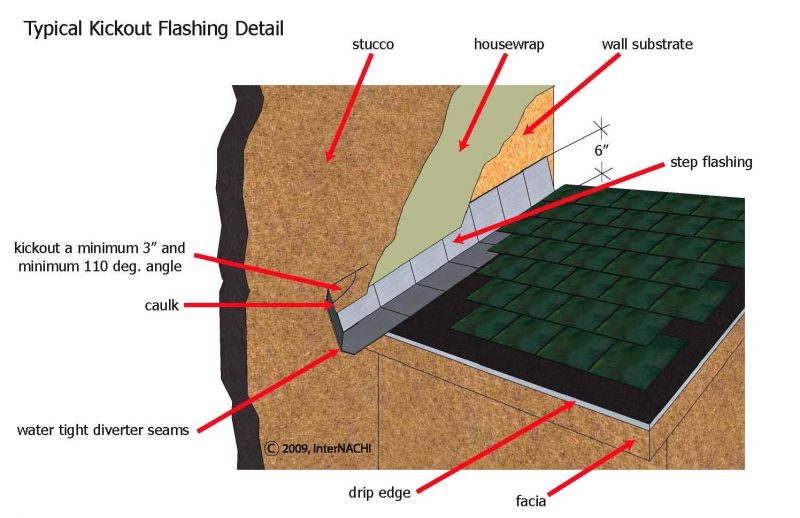
4. If you’re installing flashing near a vertical wall, make sure to use a kickout flashing. This specialized flashing helps to divert water away from the wall and prevent it from infiltrating the building envelope.
5. Once all the flashings are in place, double-check that everything is secure and fits tightly against the roof. Any gaps or loose edges can allow water to penetrate the roof, so it’s essential to make sure everything is sealed properly.
6. Lastly, touch up any damaged or incorrect flashings, and make any necessary repairs. This step requires careful attention to detail and quality workmanship. If you’re not confident in your abilities or don’t have the necessary experience, it’s best to call a professional roofing team to ensure the job is done right.
Installing roof flashing may seem like a basic step in the construction process, but it’s one that requires expertise and careful attention. By following this step-by-step guide and using high-quality flashings, you can ensure that your roof is protected from leaks and water damage for years to come.
Common Flashing Solutions
There are several common flashing solutions that every homeowner should be aware of. These include bootvent flashings, which are used for roof installations that require ventilation, and counter flashings, which are used to protect exposed edges of other flashings. Each solution has its own specific purpose, so it’s vital to consult with a roofing expert to determine which type of flashing is best for your needs.
| Flashing Type | Purpose |
|---|---|
| Bootvent Flashings | Provide ventilation for roofs |
| Counter Flashings | Protect exposed edges of other flashings |
By learning about the different types of flashings and their purposes, you can make an informed choice when it comes to installing flashing on your roof. Ensuring proper flashing installation is essential for the long-term life and performance of your roof, so don’t overlook the importance of this crucial step in the roofing process.
Step 4: Seal the Flashing
Sealing the flashing is a required step to ensure a proper installation. It shouldn’t be overlooked, as it is crucial for the long-term performance and life of your roof.
When sealing the flashing, you will need the right tools and materials. Selecting a high-quality sealant is important, as it needs to withstand different weather conditions and help keep your roof watertight. Sealants like Oatey’s thermoplastic roofing sealants are a better choice compared to thin, malleable sealants. They can stand up to the test of time and ensure a tight seal.
Start by placing a continuous bead of sealant along the base of the chimney or any other areas where the flashing needs to be sealed. Make sure to extend the sealant about 3-4 inches onto the roof surface, overlapping with the shingles.
When installing roof flashing around skylights or ventilation pipes, use sealant around the base as well as any gaps between the flashing and the roof surface. This will help prevent any water leaks or air drafts.
Avoid using nails to secure the flashing, as this might cause holes or damage the material. Instead, use roofing screws or skip the fasteners altogether if the flashing is designed to be self-adhesive.
It is important to follow the manufacturer’s instructions when applying the sealant. Some sealants may require a specific temperature range or drying time before they can be exposed to the elements.
Work carefully to ensure that the flashing is properly sealed to avoid any future water damage or leaks. Seek the assistance of a professional if needed, as they have the knowledge and experience to install flashing correctly.
By following these guidelines and sealing the flashing correctly, you can extend the life of your roof and avoid costly repairs in the future. Don’t underestimate the importance of this step in the installation process. It is an investment in the safety and durability of your home.
Question-answer:
What is roof flashing and why is it important?
Roof flashing is a material, usually made of metal or plastic, that is installed around roof penetrations and areas where different slopes of the roof meet. It helps to prevent water from entering the building and protects these vulnerable areas from leaks and water damage.
What are the different types of roof flashing?
There are several different types of roof flashing, including drip edge flashing, step flashing, valley flashing, and pipe flashing. Each type is used for a specific purpose and is installed in a different area of the roof.
Can roof flashing be installed by homeowners or is it a job for professionals?
While it is possible for homeowners to install roof flashing themselves, it is a job that is best left to professionals. Improper installation can lead to leaks and water damage, so it is important to hire someone with experience and knowledge in roof flashing installation.
How often should roof flashing be inspected and maintained?
Roof flashing should be inspected and maintained on a regular basis, at least once a year. This can help to prevent any potential issues and ensure that the flashing is still in good condition and functioning properly.
What are some signs that roof flashing needs to be repaired or replaced?
Some signs that roof flashing may need to be repaired or replaced include water stains on the ceiling, mold or mildew growth, or visible signs of damage such as rust or corrosion. If you notice any of these signs, it is important to have the flashing inspected and repaired as soon as possible to prevent further damage.
What is roof flashing and why is it important?
Roof flashing is a material, usually made of metal, that is installed around roof penetrations and joints to prevent water from seeping in. It is important because it helps to direct water away from vulnerable areas of the roof, preventing leaks and water damage.

 Create a Three-Season Room With a DIY Screened-In Porch
 Expert Guide – Calculating the Number of Pavers You Need for Your Project
 When to Replace a Porch Column